User:Scissors
The Pack is meant to be efficient, effective, a well-oiled machine. Last thing we need is to enter combat as a disorganized, chaotic mob where everyone is asking what's going on. The idea is to split the Pack into smaller, easier-to-command squads; the main advantage with squads is that they can support each other to carry out tactical objectives, and to provide relief for each other if something goes south.
Pack Drills are important so that the pack instinctively knows what their roles are once combat is joined, and what their respective squads are responsible for.
Valka is commonly assigned to Charlie Squad, to maintain strategic battlefield oversight and command the reserves; there are currently no reserves to be commanded by Valka, but this may change if we recruit new members in the future. Never underestimate the importance of tactical reserves: many battles in history were won or lost by the critical application of battlefield reserves.
Sjovold is by default the field commander of the pack. While Valka defines the tactical objectives of a mission, Sjovold is responsible for achieving those objectives, decides what squad deployment and operational tactics to employ in combat.
When working with outsiders who do not operate in small-units, standard procedure is to split them up and attach them to individual squads under pack command. This is to ensure that they follow orders in combat, not be distracted by personal concerns, nor waste time arguing over tactical decisions.
Potential deployment ideas (subject to discussions and changes):
Pack Standard Combat Deployment
- Alpha Squad - Assault A
- Sjovold (Squad Leader)
- Ikni
- Rune
- Bravo Squad - Assault B
- Matt (Squad Leader)
- Eva (Alternate Squad Leader)
- Tonsyr
- Charlie Squad - Reserve/Relief
- Valka (Squad Leader)
- Future pack members (noncombatant)
- Deployment Notes:
- This is the default combat deployment.
- The two assault squads will be performing front-line combat missions as self-contained units.
- Charlie Squad acts as reserve, watch for enemy ambushes/counterattacks, intervene to pull out assault squads if they are being overrun, mop-up and backup.
Pack Strike Deployment
- Alpha Squad - Fire Group
- Sjovold (Squad Leader)
- Rune
- Bravo Squad - Infiltration
- Matt (Squad Leader)
- Eva (Alternate Squad Leader)
- Ikni
- Charlie Squad - Reserve/Relief
- Valka (Squad Leader)
- Tonsyr
- Future pack members (noncombatant)
- Deployment Notes:
- Alpha Squad's primary goal is to engage enemy at range, lay down suppression fire for Bravo Squad.
- Bravo Squad serves as spearhead, advance, infiltrate and neutralize under Alpha Squad fire support.
- Charlie Squad acts as Reserve/Relief. In Deep Strike missions, must provide back up and exploitation missions.
- This deployment plan is subject to change and refinement.
Pack Defense Deployment
- Alpha Squad - Extraction
- Sjovold (Squad Leader)
- Matt
- Eva
- Bravo Squad - Shield
- Valka (Squad Leader)
- Ikni
- Tonsyr
- Rune
- Future pack members (noncombatant)
- Deployment Notes:
- Defense Deployment will be activated in case of an enemy ambush, defending a tactical position (such as base camp), or against overwhelming enemy numbers.
- Bravo Squad will act as shield, remain as a cohesive defensive unit to protect the non-combatants.
- Alpah Squad will attempt an extraction/breakout spearhead when appropriate.
Pack Sweep Formation
- Deployment Notes:
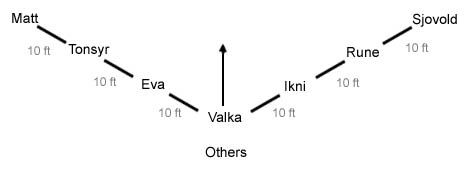
- Standard Sweep Formation Deployment (L-to-R) in a shallow inverted V, if space is available.
- Sweep formation is deployed when crossing unknown, potentially hostile territory. The spread prevents the pack from being ambushed/trapped in one swoop, or being targetted by area-effecting hostile fire.
- Future non-combatant pack members should follow behind the sweep line.
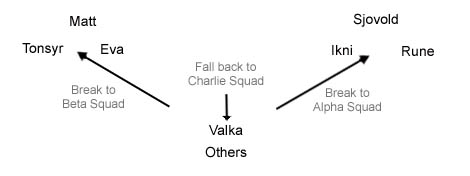
- In case of enemy contact, Sweep Formation can be rapidly changed to default Combat formation:
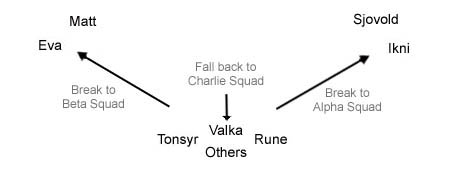
- An alternate deployment should be used if enemy contact is made, and disengagement is desired. This is a variation of the standard Combat formation, that allows the main body of the Pack to withdraw under fire.


